Monday, December 17, 2012

Hand-made wrapping paper: Christmas trees


 The following pictures document my attempt at making Xmas wrapping paper using the palm of my son's hand... Not my most successful project, but fun nontheless. The paper got a bit wrinkled, but it would be ok for a larger parcel

plain wrapping paper from Ikea + tempera/school paint

Á's hand prints


Final touches, I gave up on the garlands after the first row :)

Thursday, December 13, 2012

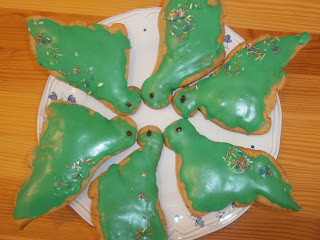
Dinosaur cookies

 I make these treats for my son's birthday party. They are a corrupted version of my grandma's heathy-ish honey cookies with lots and lots of glazing.

Glazing:
1 cup powdered sugar
2 teaspoons sugar syrup (sugar+water melted)
2 teaspoons of milk
food coloring

Cookies:
3 eggs ---whisk lightly
3 tablespoons of oil
4 tablespoons of liquid honey
1/4-1/2 nutmeg
1 teaspoon of cinnimon
1/4 teaspoon of clove
lemon peel/orange peel
--- Whisk all above
add
25 dkg sugar

---Whisk some more
add
50 dkg flour
1/2 teaspoon baking soda
1/2 salt
--- knead by hand


Thursday, November 29, 2012

Felt coaster for kids


I was making felt coasters as gifts when Á asked me to make him one with his doggy's face on it.
He was not happy with the first one I made because the ears and face of the dog were of the same color, so we made another one which he"colored" with embroidery yarn. It turned out really cute:
I used a CD as a template for the felt part and the coaster and the top brim of a tea mug for the fabric (a leftover scrap of IKEA Gunilla fabric).


Finger printed giftcards

We made there cute gift cards for A's teachers last night.
I cut 7x11 cm rectangles to make the cards, and A dipped his ring finger and thumb in acrylic paint (we practiced with an ink pad to work out which works best) to make the snowmen. Afterwards, he drew faces, arms, feet ect on the snowmen with a black marker, and I painted on the orange noses. The one in the middle is everyone's favorite!
We look the idea from Fiona Watts' wonderful 356 things to make and do book which we both love so much!

DIY gifts for teachers/hand-made soap with kids

Our class is buying my son's teachers a larger gift, but I wanted to make something special to give them too. My choice fell on handmade soaps. We used the melt and pour method with glicerine soap. I just bought some glycerine soap at the drugstore and we cut it up and melted it (over stream), and we poured it into Ikea Plastis ice trays (they say that the trays are for water only--- but I'm a badass crafter:) ).
It was super easy and lots of fun.

 You can buy glycerine blocks to make soap out of at craft shops but glycerine soap is actually cheaper than the craft kind.  I tried melting cheaper/harder glycerine soap, but it did not melt.

You can also add stuff like poppy seeds, cinnimon, dried lavender to make soap more interesting. I could not figure out what would smell good with olive.


Melting the cut up soap cubes

The cubes start to melt

We filled the trays and let the soap harden in the fridge.


Saturday, October 27, 2012

Wednesday, October 10, 2012

Pom pom wreath


The wreath was made using leftover yarn and and a re-purposed jersey belt and a styrafoam ring.

1. I wrapped the ring with a belt thingy:
2. I sewed the end of the belt onto the rest o the material, I could have glued it on as well (but this way I can use it again for other projects):

3. I made the pompoms with a fork, here is a cool tutorial for it from the EX Expat: http://exexp.at/post/29512224064/diy-mini-pompoms 
picture from http://exexp.at/post/29512224064/diy-mini-pompoms
4.  I sewed the pompoms on and tied some of the yarn onto the top pf the wreath.


Pencil box with scrapbook paper

I made this pencil box for my son to match his new desk. He chose a cool vintage newspaper print scrapbook paper at the store which has funny advertisments, which he can not yet appreciate... So there is more fun to come later :)


1. I traced the 4 sides o the box and cut out slightly smaller shapes from the scrap book paper.
2. My son painted along all the corners where the paint would show. 
3. I applied pva glue to the paper with a plastic brush (to prevent air bubbles) and carefully placed in on the box.
4. I used acrylic varnish outside and inside the box (so it will be easier to remove pencil marks-- son's idea)

Thursday, September 20, 2012

Chopping board turned key holder


I saw some keyholders on Pinterest made from blocks of wood and nails/hooks, and thought I could paint a picture on a wooden surface and add some hooks. However the only solid wood object that I found at my local arts n crafts store was a chopping board. At least we do not need to drill a hole in the wood, right?


So after some paint and scrapbook paper, this what I came up with :

<a href="http://pinterest.com/ffeltist/"><img src="http://passets-cdn.pinterest.com/images/about/buttons/big-p-button.png" width="60" height="60" alt="Follow Me on Pinterest" /></a>


Redecorating / upcycling old desk for kids


Our up-cycled desk


My aunt offered us this old-school desk that my 20+ cousins had inherited from someone else back in the day. Having had seen what was on offer at IKEA I was all for it. So here are some before pictures. The desk is made from varnished plywood and I would guess it is about 30 years old
The door had an aluminum lock cover and some

the desk once had drawers
We fit two pieces of wood onto the drawer slides and made shelves


There was some damage on the surface of the desk door.
I fixed the chipping with a material called Fakitt which is sort of like plaster for wood. I had to apply several layers with a brush and used sandpaper in to even it out after the material dried.


My husband helped take the desk apart and genty sanded the surfaces of the desk (all except for the top)

I painted the surfaces with a special base paint (Primer Aggrappante from www.stamperia.com) to make sure that the acrylic paint sticks to the surface of the plywood. 


We changed the lock cover and bought a key so my son can lock his little brother out of his stuff

Taaadaaaa!
The desk in Á's study corner.


Thursday, August 9, 2012

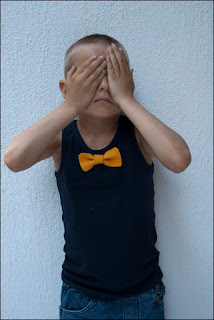
Felt bowties aka Wife-beaters with felt bowties


After a number of complaints by readers (ok the number is one and the reader (sans s) was my sister) that I have not posted in a while, I made some fancy tops for my sons to wear to my dad's name day party. I saw a onesie with bowtie on it on the web, but it is too hot for onesies at the moment and my elder son does not wear them any more.

They were surprisingly easy to make!
I cut out a rectangle shape of felt in the size  I wanted and clipped the corners for a less severe look.
I pinched the rectangle in the middle and secured it with a couple of stitches 
I cut a narrow bit of felt and wrapped it around the middle of the bow and sewed it onto the bow. I could have used a glue gun for this and the previous sewing as well.
felt bowtie makes all the difference! :)